[Spring MVC] AOP 알아보기
AOP (Aspect-Oriented Programming)
AOP는 Aspect-Oriented Programing의 약자이다.
이름 그대로 관점 지향 프로그래밍인데 관점이란 관심사라고 이해하면 된다.
스프링에서는 AOP를 지원하는데 이를 활용하면 관심사와 로직을 분리할 수 있다.
예를 들어 메소드의 실행시간을 알고 싶은 경우에 기존의 코드를 수정하지 않고
실행시간이라는 관심사에 대한 코드를 따로 작성하여 제어할 수 있다.
AOP용어

Proxy는 Target을 전체적으로 감싸고 있으며 내부적으로 Target을 호출한다.
스프링에서는 auto-proxt를 통해서 자동으로 생성할 수 있다.
JoinPoint는 Target객체가 가지는 메소드이다.
Target객체는 여러가지 메소드가 존재할 수 있다. (여러 개의 JoinPoint)
그래서 어떤 JoinPoint(메소드)와 결합할지 정해야한다. 이 결정을 Pointcut이라고 한다.
Aspect는 추상적인 개념의 관심사 자체이다.
Advice는 Aspect를 구체적으로 구현한 코드이다.
Advice는 동작위치에 따라 구분할 수 있다.
- Before Advice : Target의 JoinPoint를 호출하기 전에 실행
- After Returning Advice : 모든 실행이 정상적으로 완료된 후 실행
- After Throwing Advice : 예외가 발생한 뒤에 실행
- After Advice : 코드가 실행된 후 실행 (정상적이거나 예외이거나 상관없이 실행됨)
- Around Advice : 메소드의 실행 자체를 제어할 수 있음, 직접 메소드를 호출하고 결과나 예외를 처리할 수 있음
Pointcut의 다양한 선언방법
- execution(@execution) : 메서드를 기준으로 Pointcut설정
- within(@within) : 특정한 타입(클래스)을 기준으로 Pointcut설정 ex) within("org.test.aop.HomeController")
- this : 주어진 인터페이스를 구현한 객체를 대상으로 Pointcut설정
- arg(@args) : 특정한 파라미터를 가지는 대상들만을 Pointcut으로 설정
- @annotation : 특정한 어노테이션이 적용된 대상들만을 Pointcut으로 설정
전체적으로 Proxy객체를 통해서 Target객체의 JoinPoint를 호출하는 방식이다.
AOP 실습
AOP는 주로 Java API를 이용하는 클래스들에 적용한다.
Controller에도 적용이 가능하지만 Controller는 인터셉터나 필터를 이용하면 된다.
1) pom.xml
프로젝트를 생성하고 pom.xml의 <properties>에서 스프링 버전을 변경해준다.
그리고 AspectJ 버전도 변경해준다. (AOP는 이 라이브러리의 영향을 받음)
	<properties>
		<java-version>1.8</java-version>
		<org.springframework-version>5.0.7.RELEASE</org.springframework-version>
		<org.aspectj-version>1.9.0</org.aspectj-version>
		<org.slf4j-version>1.7.25</org.slf4j-version>
	</properties>
AOP처리가 된 객체를 생성하기 위해서 AspectJ Weaver 라이브러리가 필요하다.
아래 코드를 추가해준다.
		<dependency>
		    <groupId>org.aspectj</groupId>
		    <artifactId>aspectjweaver</artifactId>
		    <version>${org.aspectj-version}</version>
		</dependency>
2) 서비스 인터페이스와 구현
SampleService.class 인터페이스
public interface SampleService {
	public Integer doAdd(String str1, String str2) throws Exception;
}
SampleServiceImpl.class 구현
@Service
public class SampleServiceImpl implements SampleService{

	@Override
	public Integer doAdd(String str1, String str2) throws Exception {
		return Integer.parseInt(str1) + Integer.parseInt(str2);
	}
}
3) AOP 코드 작성
lgo는 핵심 로직이 아니지만 반복적으로 사용되는 코드이다.
즉 핵심은 아니지만 관심사이다.
그래서 log에 대한 처리를 AOP로 예제를 작성했다.
@Aspect : AOP의 추상적인 관심사임을 표시
@Component : 빈으로 등록하기 위한 설정
@Before : 뒤의 execution에서 설정한 경로의 메소드가 실행되기 전에 실행된다.
여기서 execution는 pointcut이다.
"execution(* org.... *.*(..))" : 맨 앞의 *은 접근제한자, 맨 뒤의 *은 클래스이름 또는 메소드 이름
정리하자면 org.zerock.service.SampleService 아래에 있는 메소드는 @Before의 영향을 받아서
실행되기 전에 "------"가 출력될 것이다.
@Aspect
@Log4j
@Component
public class LogAdvice {
	@Before("execution(* org.zerock.service.SampleService*.*(..))")
	public void logBefore() {
		log.info("-----------------------------");
	}
}
4) root-context.xml 설정
aop를 사용하기 위해서 root-context.xml의 namespace에서 aop를 추가해줘야한다.

그리고 빈 객체로 등록하기 위해서 component-scan에 경로를 추가해줬다.
aspectj-autoproxy는 자동으로 proxy객체를 생성해준다.
	<context:component-scan base-package="org/zerock/service"></context:component-scan>
	<context:component-scan base-package="org/zerock/aop"></context:component-scan>
	<aop:aspectj-autoproxy></aop:aspectj-autoproxy>
이제 다시 SampleServiceImpl 클래스에 가보면 메소드 옆에 화살표 아이콘이 생긴것을 확인할 수 있다. (AOP가 적용됨)

5) 테스트하기
인터페이스인 SampleService에 구현된 클래스를 주입받았다.
@ContextConfiguration("file:src/main/webapp/WEB-INF/spring/root-context.xml")
@RunWith(SpringJUnit4ClassRunner.class)
@Log4j
public class SampleTest {
	@Setter(onMethod_ = @Autowired)
	SampleService service;
}
service를 출력해봤다.
그냥 service를 출력하면 SampleServiceImpl 객체이다.
하지만 getClass().getName()을 하면 좀 더 자세한 결과를 볼 수 있다.
그 결과 Proxt클래스의 인스턴스라는 것을 알 수 있다.
	@Test
	public void test() {
		log.info(service);
		log.info(service.getClass().getName());
	}
아래 코드를 실행해보면 doAdd메소드에 적용된 @Before에 의해서 "-----"가 출력된 것을 볼 수 있다.
	@Test
	public void testAdd() throws Exception{
  		int result = service.doAdd("123", "457");
		log.info("결과 : " + result);
	}
6) 다양한 Advice의 동작 위치
- @Before를 사용하면서 파라미터 값을 알고 싶을 때
아래와 같이 코드를 작성하면 doAdd가 실행되기 전에 파라미터 값을 출력해서 확인할 수 있다.
하지만 파라미터가 다른 여러 종류의 메소드의 경우에는 적용하기 쉽지 않다.
이 경우에는 @Around와 @ProceedingJoinPoint를 사용하면 된다.
	@Before("execution(* org.zerock.service.SampleService*.doAdd(String, String)) && args(str1, str2)")
	public void logBeforeWithParam(String str1, String str2) {
		log.info("str1 : " + str1);
		log.info("str2 : " + str2);
	}
- @AfterThrowing 을 사용해서 에러 확인
해당 경로에서 에러가 나면 log에서 출력해준다.
	@AfterThrowing(pointcut = "execution(* org.zerock.service.SampleService*.*(..))", throwing = "exception")
	public void logException(Exception exception) {
		log.info("Exception!! ");
		log.info("exception " + exception);
	}
테스트를 실행한 결과 먼저 before에 args를 설정하여 파라미터 값을 출력했다.
또 파라미터 값에 a가 있어서 에러를 발생시켰고 그 내용을 출력했다.

- @Around를 사용해서 제어하기
@Around에 execution을 통해 pointcut을 설정하고 실행시간을 출력하는 코드를 작성했다.
ProceedingJoinPoint를 파라미터로 지정하는데 이를 활용해서 Target과 파라미터 등을 확인할 수 있다.
특이하게 @Around를 사용한 메소드는 return값을 가지고 있어야한다.
@Around는 @before보다 먼저 작동하고
proceedingJoinPoint객체의 .proceed()를 통해 결과를 반환해서 그런 것 같다.
또 joinPoint.getArgs() 메소드를 통해서 입력된 파라미터를 가져올 수 있다.
이 덕분에 파라미터가 다른 여러 종류의 메소드에 함께 적용할 수 있다.
(가지고 있는 파라미터를 모두 가져오기 때문에!)
	@Before("execution(* org.zerock.service.SampleService*.*(..))")
   	 public void logBefore() {
		log.info("-----------------------------");
	}

	@Around("execution(* org.zerock.service.SampleService*.*(..))")
	public Object longTime(ProceedingJoinPoint joinPoint) {
		long start = System.currentTimeMillis();
		log.info("Target : " + joinPoint.getTarget());
		log.info("Param : " + Arrays.toString(joinPoint.getArgs()));

		Object result = null;
		try {
			result = joinPoint.proceed();
		} catch (Throwable e) {
			log.info(e);
		}
		long end = System.currentTimeMillis();
		log.info("Time :  " + (end - start));
		return result;
	}
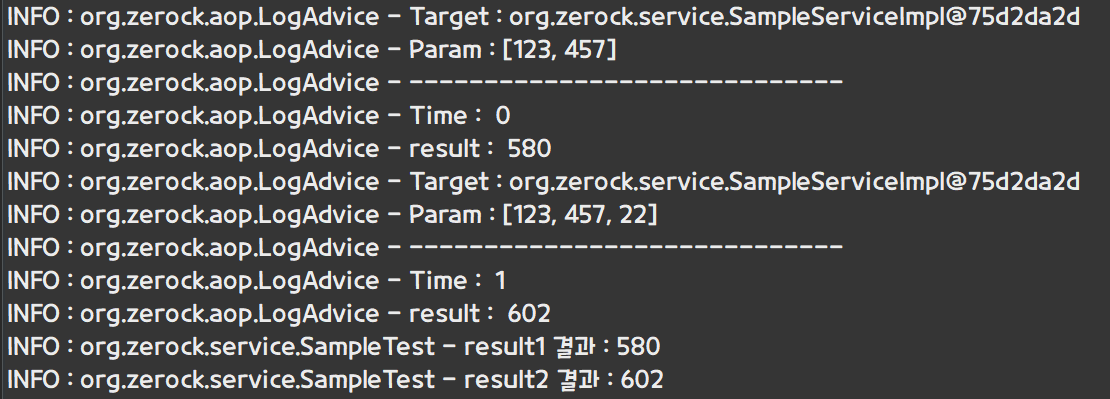
test 코드
테스트를 위해 서로 다른 파라미터를 가진 동일한 이름의 메소드를 생성해서 테스트해봤다.
	@Test
	public void testAdd() throws Exception{
		int result1 = service.doAdd("123", "457");
		int result2 = service.doAdd("123", "457","22");
		log.info("result1 결과 : " + result1);
		log.info("result2 결과 : " + result2);
	}
결과
@Around를 먼저 처리하고 @Before가 실행되었다.
만약에 @Around가 적용된 메소드에 반환 값이 없다면 어떻게 나올지 테스트해봤다.
return 타입을 void로 바꿨다.
	@Before("execution(* org.zerock.service.SampleService*.*(..))")
   	 public void logBefore() {
		log.info("-----------------------------");
	}

	@Around("execution(* org.zerock.service.SampleService*.*(..))")
	public void longTime(ProceedingJoinPoint joinPoint) {
		long start = System.currentTimeMillis();
		log.info("Target : " + joinPoint.getTarget());
		log.info("Param : " + Arrays.toString(joinPoint.getArgs()));

		Object result = null;
		try {
			result = joinPoint.proceed();
		} catch (Throwable e) {
			log.info(e);
		}
		long end = System.currentTimeMillis();
		log.info("Time :  " + (end - start));
	}
@Around가 적용된 메소드는 실행이 돼서 아래와 같이 출력이 되지만
int result = service.doAdd("123","457"); 에서 service.doAdd("123","457")값이 null이라서
이후 실행이 멈추고 에러가 발생한다.


* 참고
실제 프로젝트에서 log를 확인하기 위해서 src/main/resources의 log.xml파일을
아래와 같이 수정해야한다.
